微信小程序(应用号)开发实战记账软件案例
时间:2024/5/18作者:未知来源:手揣网教程人气:
- [摘要]官方开发有了更新v0.10.101100,Picker的mode属性已经支持date以及time(background-image的bug也修复),于是来更新此实例。目标:实现集成日期组件如图步骤,...
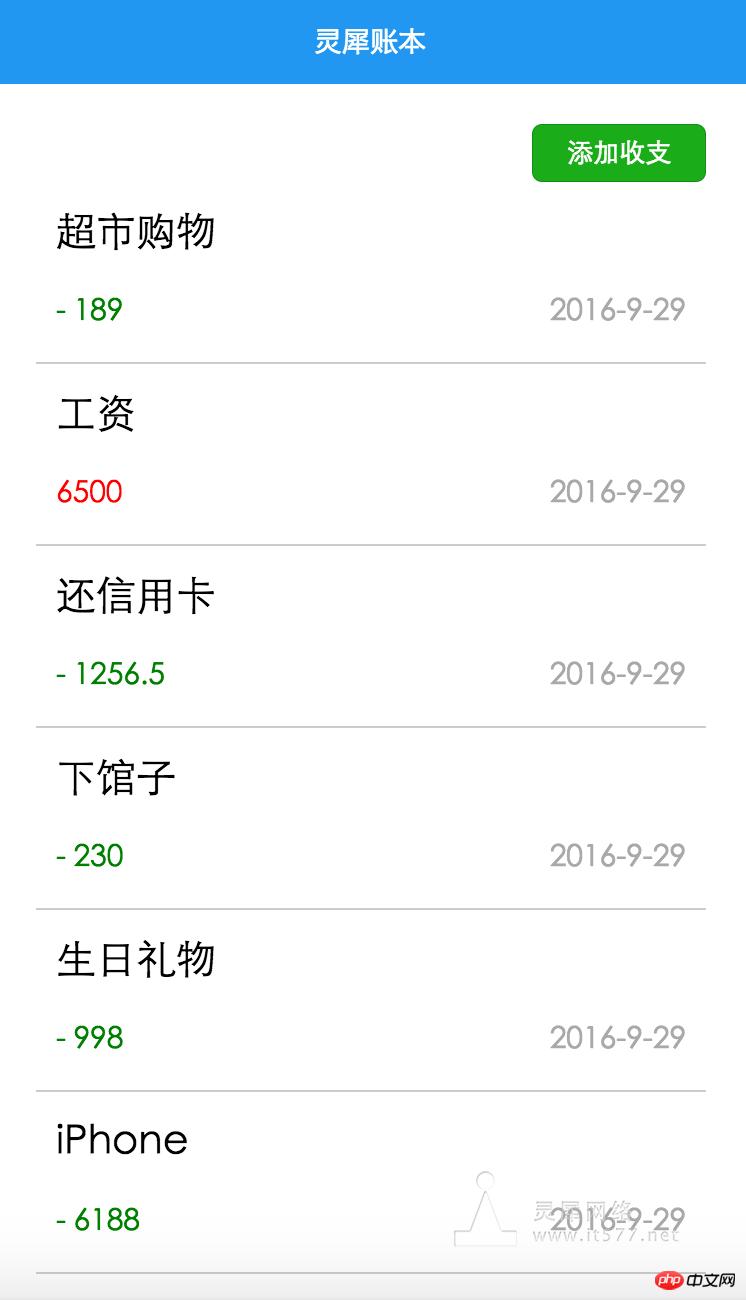
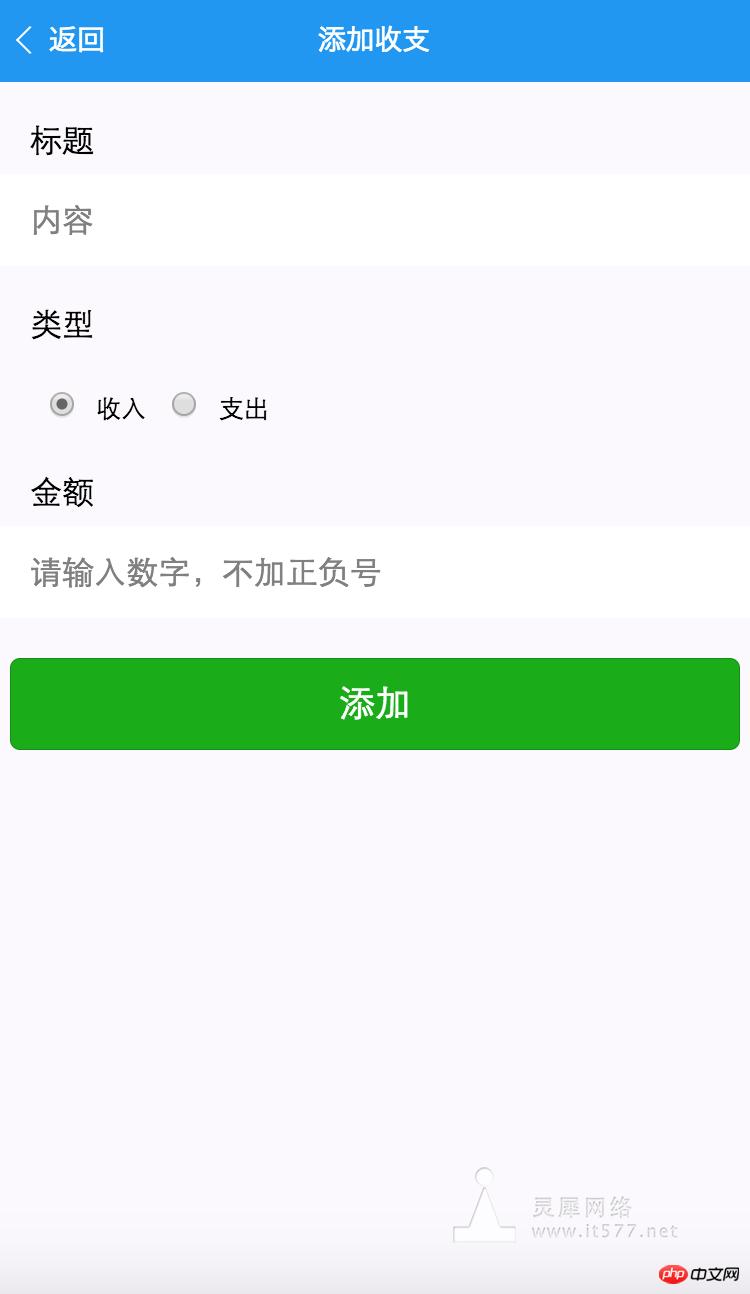
官方开发有了更新v0.10.101100,Picker的mode属性已经支持date以及time(background-image的bug也修复),于是来更新此实例。
目标:实现集成日期组件
如图
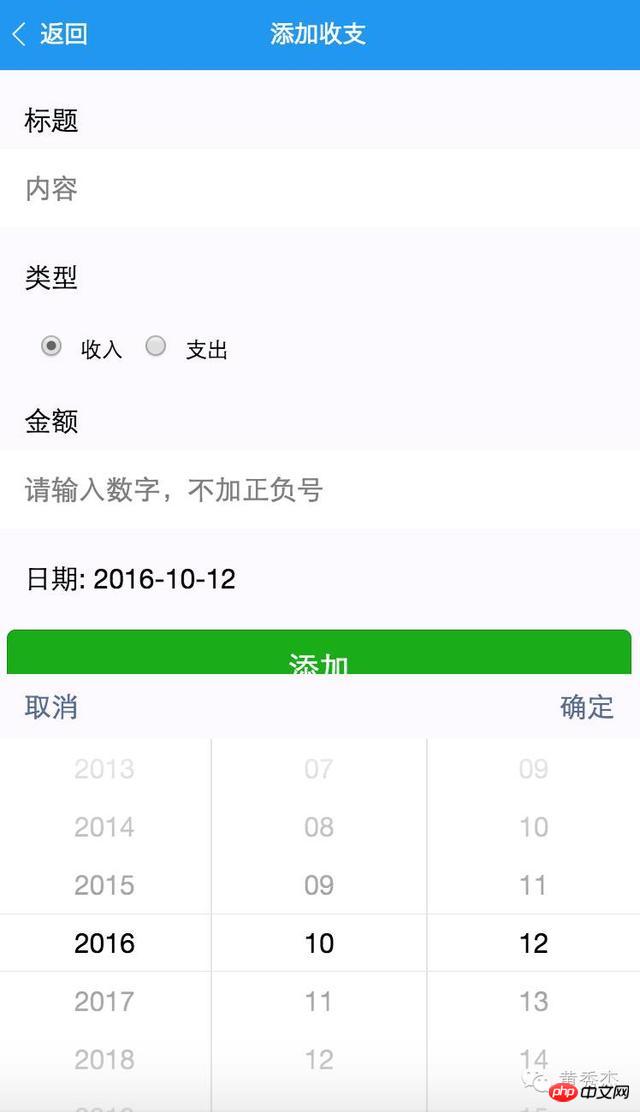
步骤,在item.wxml文件中增加一个picker组件,如下:
    <view class="section">
        <picker mode="date" value="{{date}}" start="2015-09-01" end="2017-09-01" bindchange="bindDateChange">
            <view class="section__title">
              日期: {{date}}
            </view>
        </picker>
    </view>
如图
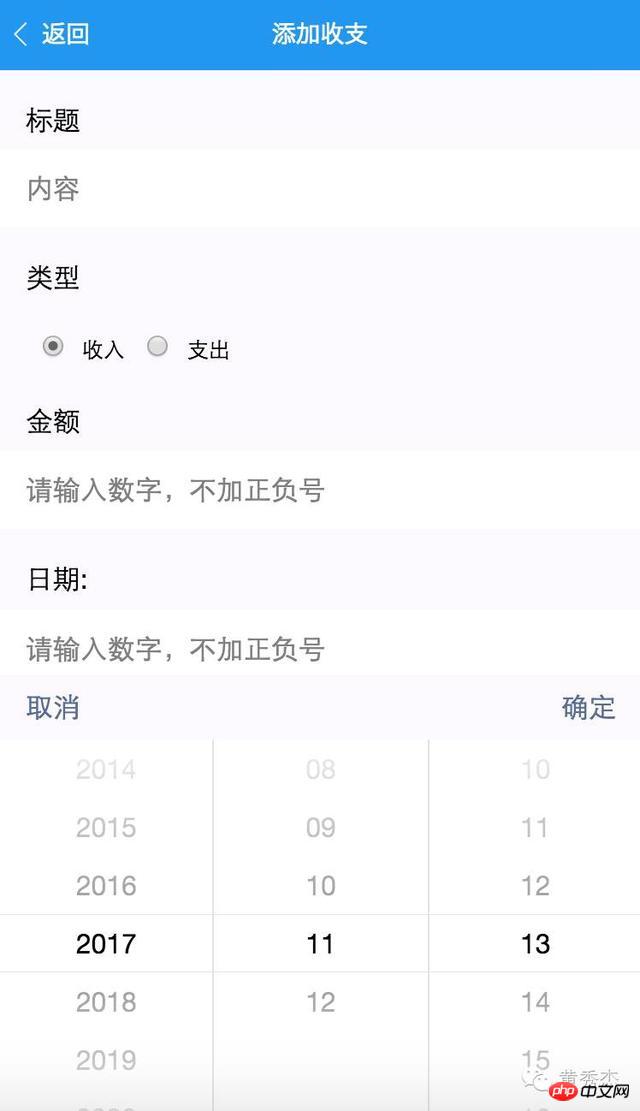
从图中可以看出:
1.日期后面是空白的,应该默认显示今天日期;
2.点击确定也没有显示到组件上,需要实现bindDateChange方法。于是我们需要在item.js文件中,声明一个data值date与wxml中的{{date}}绑定关联
然后在onLoad中初始化字符串格式的日期值,详细说明见注释:
// 获取当前日期 var date = new Date(); // 格式化日期为"YYYY-mm-dd" var dateStr = date.getFullYear() + "-" + (date.getMonth() + 1) + "-" + date.getDate(); // 存回data,以渲染到页面 this.setData({ date: dateStr })经过如上处理,日期组件已经显示为当前日期
如图
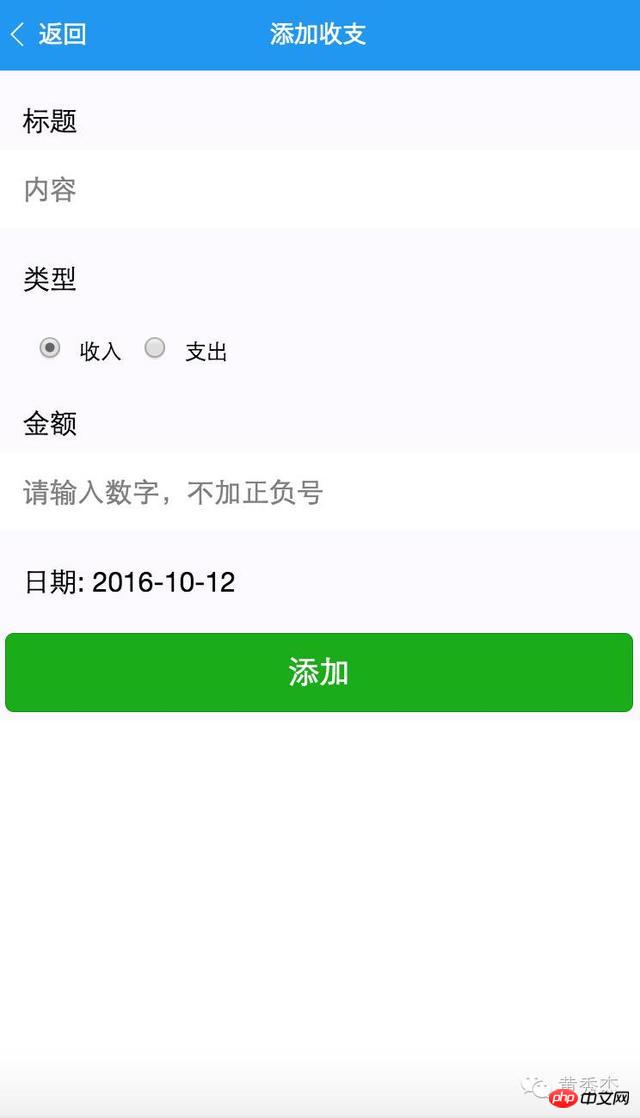
处理到此,我们还需要修复一个逻辑错误,即组件的结束日期应该不超过当日,做法也很简单,只需要在wxml文件中对picker的日期属性end由2017-09-01改为{{date}}即可
<picker mode="date" value="{{date}}" start="{{date}}" end="2017-09-01" bindchange="bindDateChange">吐槽一下,官方的picker的还是有bug的,完全不听start与end使唤,仍可以选任意日期,暂时不去理会,代码就这么写着,什么时候开发工具修复了自然可以了,毕竟是现在还只是内测,就将就用着。
接下来处理日期组件点击确认事件bindDateChange
回到item.js文件
声明一个bindDateChange方法,添加如下代码以写回data中的date值
// 点击日期组件确定事件 bindDateChange: function(e) { this.setData({ date: e.detail.value }) }至此,已经实现集成日期picker组件。剩下的就是将它同之前的标题、类型、金额字段那样存在json再本地setStorage存储即可,这里不作赘述,具体可以参考本人公众号之前发的文章《微信小程序(应用号)实战课程之记账应用开发》。
步骤
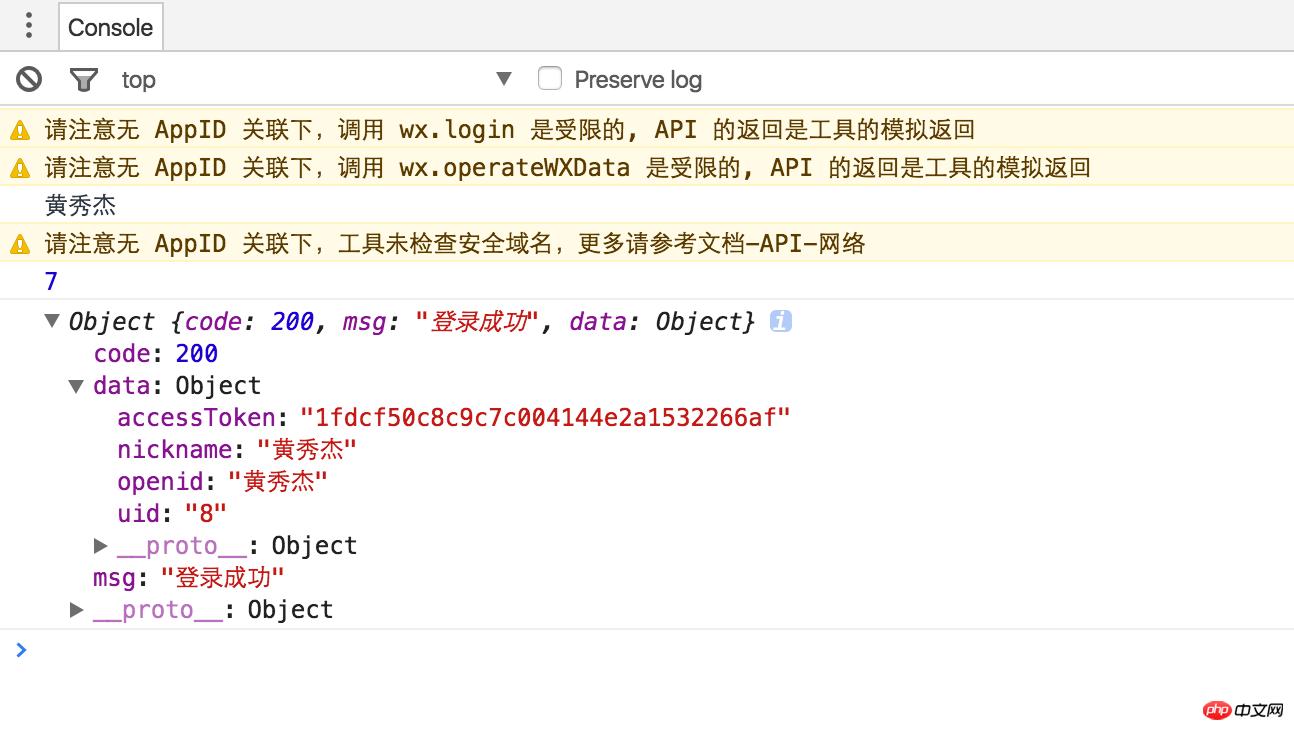
1.小程序端通过微信第三方登录,取出nickname向服务端请求登录,成功后本地并缓存uid,accessToken
接口出处:https://mp.weixin.qq.com/debug/wxadoc/dev/api/api-login.html
App({ onLaunch: function() { wx.login({ success: function(res) { if (res.code) { //发起网络请求 wx.request({ url: 'https://test.com/onLogin', data: { code: res.code } }) } else { console.log('获取用户登录态失败!' + res.errMsg) } } }); } })缓存用户的基本信息
index.js
onLoad: function(){ var that = this //调用应用实例的方法获取全局数据 app.getUserInfo(function(userInfo){ //请求登录 console.log(userInfo.nickName); app.httpService( 'user/login', { openid: userInfo.nickName }, function(response){ //成功回调 console.log(response); // 本地缓存uid以及accessToken var userinfo = wx.getStorageSync('userinfo') {}; userinfo['uid'] = response.data.uid; userinfo['accessToken'] = response.data.accessToken; console.log(userinfo); wx.setStorageSync('userinfo', userinfo); } ); }) }app.js
定义一个通用的网络访问函数:
httpService:function(uri, param, cb) { // 分别对应相应路径,参数,回调 wx.request({ url: 'http://financeapi.applinzi.com/index.php/' + uri, data: param, header: { 'Content-Type': 'application/json' }, success: function(res) { cb(res.data) }, fail: function() { console.log('接口错误'); } }) },这里method默认为get,如果设置为其他,比如post,那么服务端怎么也取不到值,于是改动了服务端的取值方式,由$POST改为$GET。
在Storage面板中,检查到数据已成功存入

[2016-10-25]
由单机版升级为网络版
1.缓存accessToken,以后作为令牌使用,uid不必缓存,由服务端完成映射,user/login接口
先来回顾一下app.js封装的httpService的代码实现:
httpService:function(uri, param, cb) { // 分别对应相应路径,参数,回调 wx.request({ url: 'http://financeapi.applinzi.com/index.php/' + uri, data: param, header: { 'Content-Type': 'application/json' }, success: function(res) { cb(res.data) }, fail: function() { console.log('接口错误'); } }) }调用的是wx.request接口,返回res.data即为我们服务器返回的数据,结构与wx.request返回的类似,这里多一层结构,不可混淆。
response.code,response.msg,response.data是我自己服务端定义的结构
res.statusCode,res.errMsg,res.data是微信给我们定义的结构
而我们的response又是包在res.data中的,所以正常不加封装的情况下,要取得我们自己服务端返回的目标数据应该是写成,res.data.data.accessToken;好在已经作了封装,不会那么迷惑人了,今后调用者只认response.data就可以拿到自己想要的数据了。
明白了上述关系与作了封装后,我们调用起来就方便了,index.js中onShow写上如下代码
app.httpService( 'user/login', { openid: userInfo.nickName }, function(response){ //成功回调,本地缓存accessToken var accessToken = response.data.accessToken; wx.setStorageSync('accessToken', accessToken); } );app.js onLaunch调用如下代码,在程序启动就登录与缓存accessToken。
之所以不在index.js中调用登录,是因为app launch生命周期较前者更前,accessToken保证要加载item/all之前生成并缓存到本地
onLaunch: function () { //调用应用实例的方法获取全局数据 var that = this //调用登录接口 wx.login({ success: function () { wx.getUserInfo({ success: function (res) { //请求登录 that.httpService( 'user/login', { openid: res.userInfo.nickName }, function(response){ //成功回调,本地缓存accessToken var accessToken = wx.getStorageSync('logs') ''; accessToken = response.data.accessToken; wx.setStorageSync('accessToken', accessToken); } ); } }) } }) },2.请求网络,对接获取的账目列表,item/all接口
使用onShow而不使用onLoad,是因为每次添加返回后首页需要自刷新
response是服务器返回的数据
而response.data中包含了自己的账目列表信息
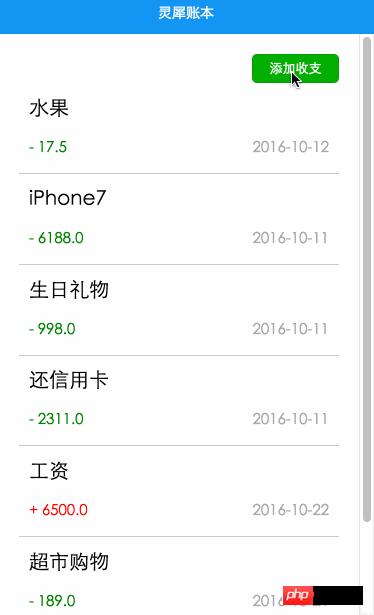
{ "code": 200, "msg": "加载成功", "data": [ { "id": "21", "title": "工资", "cate": "+", "account": "6500.0", "date": "2016-10-22", "uid": "8" }, { "id": "20", "title": "超市购物", "cate": "-", "account": "189.0", "date": "2016-10-21", "uid": "8" }, { "id": "12", "title": "抢红包", "cate": "+", "account": "20.5", "date": "2016-10-30", "uid": "8" } ] }读取代码:
onShow: function () { var that = this // 获取首页列表,本地storage中取出accessToken作为参数,不必带上uid; // 成功回调后,设置为data,渲染wxml app.httpService( 'item/all', {'accessToken': wx.getStorageSync('accessToken')}, function(response){ that.setData({ 'items':response.data }); } ); }布局代码:
<block wx:for="{{items}}"> <view class="news-item" data-title="{{item.title}}"> <view class="news-text"> <text class="news-title">{{item.title}}</text> <view class="news-stamp"> <text wx:if="{{item.cate == '-'}}" class="sign-green">{{item.cate}} {{item.account}}</text> <text wx:else class="sign-red">{{item.cate}} {{item.account}}</text> <text>{{item.date}}</text> </view> </view> </view> </block>2.请求网络,对接账目,item/add接口
拿到表单组件上的各值,title,record,cate,date,而accessToken我们就在httpService方法统一注入。
httpService:function(uri, param, cb) { // 如果令牌已经存在,那么提交令牌到服务端 if (wx.getStorageSync('accessToken')) { param.accessToken = wx.getStorageSync('accessToken'); } ...提交到网络
// 本条数据打包成json var record = { title: this.data.title, cate: this.data.cate, account: this.data.account, date: this.data.date } // accessToken放在record传入也可以,但为了更多的复用,我将它放在httpService时统一注入 // 访问网络 var app = getApp(); app.httpService( 'item/add', record, function(response) { // 提示框 that.setData({ modalHidden: false }); } );3.首页传id值,编辑页面访问网络并显示数据
1.从首页列表传item对象的id号到item页面
<view class="news-item" data-id="{{item.id}}" bindtap="itemTap">2.绑定data-id到点击单元格事件itemTap
var id = parseInt(e.currentTarget.dataset.id);
3.使用navigate传值
wx.navigateTo({ url: '../item/item?id='+id })4.item页面接收id值,并作判断有无id号
onLoad: function (options) { this.setData({ id:options.id, }) }5.读取网络返回的数据与渲染到页面
var that = this; if (options.id) { // 访问网络 var app = getApp(); app.httpService( 'item/view', {id: options.id}, function(response){ that.setData({ id: response.data.id, title: response.data.title, cate: response.data.cate, account: response.data.account, date: response.data.date }); } ); }6.并将button按钮绑定为update方法
<button wx:if="{{id}}" class="button" type="primary" bindtap="update">编辑</button> <button wx:else class="button" type="primary" bindtap="save">添加</button>7.修改账目提交到网络,item/update
客户端update方法
update: function(){ var that = this; // 本条数据打包成json var record = { title: this.data.title, cate: this.data.cate, account: this.data.account, date: this.data.date, id: this.data.id } // accessToken放在record传入也可以,但为了更多的复用,我将它放在httpService时统一注入 // 访问网络 var app = getApp(); app.httpService( 'item/update', record, function(response) { // 提示框 that.setData({ modalHidden: false }); } ); },8.删除账目,item/del接口
方法实现
delete: function () { var that = this; // 访问网络,删除账目 var app = getApp(); app.httpService( 'item/del', {id: that.data.id}, function(response){ // 提示框 that.setData({ modalTitle: '删除成功', modalHidden: false }); } ); },布局页面
先判断是否有id值,有则在编辑按钮正文出现删除按钮
<button wx:if="{{id}}" class="button" type="default" bindtap="delete">删除</button>以上就是微信小程序(应用号)开发实战记账软件实例的详细内容,更多请关注php中文网其它相关文章!
小程序是一种不需要下载安装即可使用的应用,它实现了应用“触手可及”的梦想,用户扫一扫或者搜一下即可打开应用。
关键词:微信小程序(应用号)开发实战记账软件案例